the home site for me: also iteration 3 or 4 of my site
 dunkirk.sh
1+++
2title = "Install TrueNAS Core on Proxmox"
3date = 2023-07-10
4slug = "install-truenas-core-proxmox"
5description = "How to install TrueNas Core on proxmox with drive passthrough"
6
7[taxonomies]
8tags = ["tutorial", "archival"]
9+++
10
11I have been using Proxmox for a while now but I've also wanted to make use of some large HDDs that have been lying around. I really didn't want to get another machine just for TrueNAS so I decided to install it on Proxmox. This is how I did it.
12
13<!-- more -->
14
15{caption="my active vault storing 1.8TB of old projects"}
16
17## Introduction
18
19> Note: I have since found out that running TrueNAS in a VM passing through the drives may not be a very good solution as it essentially just creates a large virtual disk that is the size of the drive you are passing through. Because of this I will not be using this setup in my homelab and will instead create a large ZFS pool on Proxmox. However if you are fine with those downsides, then have fun and enjoy the tutorial.
20
21To install [TrueNAS Core](https://www.truenas.com/download-truenas-core/#) on [Proxmox](https://www.proxmox.com/en/proxmox-ve) you need three things:
22
231. A copy of [Proxmox](https://www.proxmox.com/en/proxmox-ve) — A complete, open-source server management platform for enterprise virtualization.
242. A [TrueNAS CORE](https://www.truenas.com/download-truenas-core/#) ISO — World’s #1 NAS Operating System
253. HDDs — You can use whatever you want, but I will be using three Barracuda ES 750GB drives
26
27## Install TrueNAS Core
28
29Sign-in to Proxmox and upload your ISO to the local storage or, download the file directly from the link using the built-in ISO fetcher.
30
31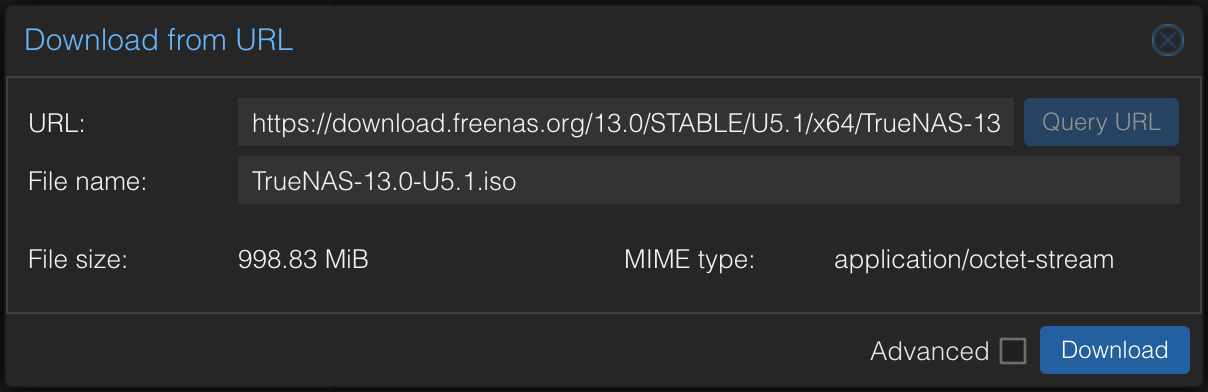
32
33Next to create the VM, the only thing that needs to be changed from the defaults is the memory, which I set to `8192 MB` (8 GB).
34
35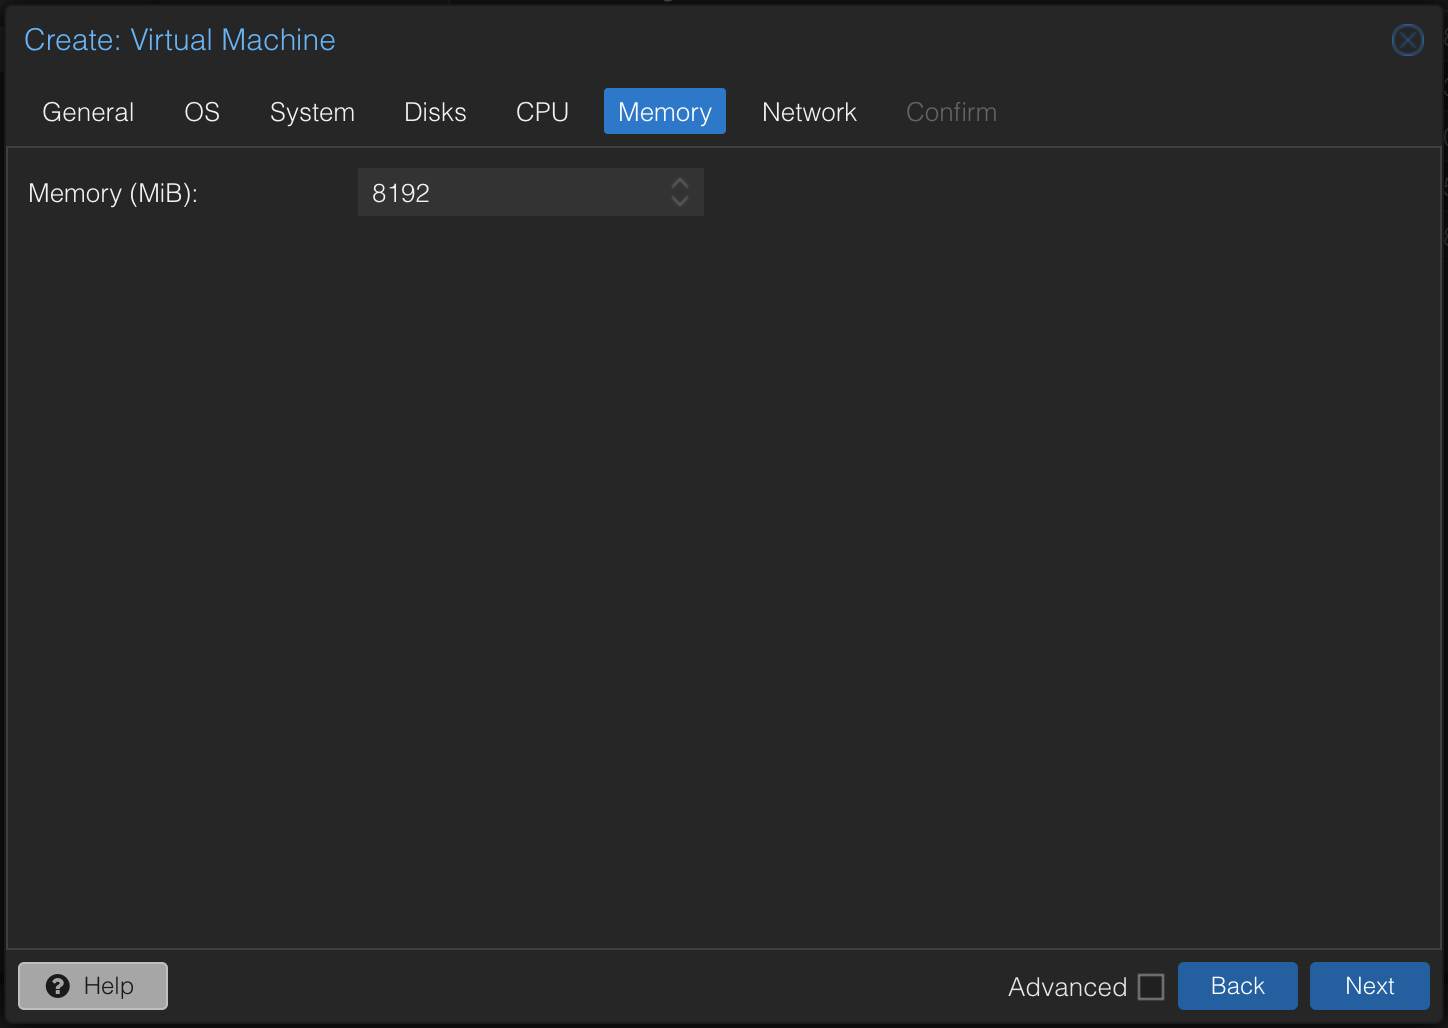
36
37Now finish creating the VM and click on the VM after it is created. Go to options and enable start at boot.
38
39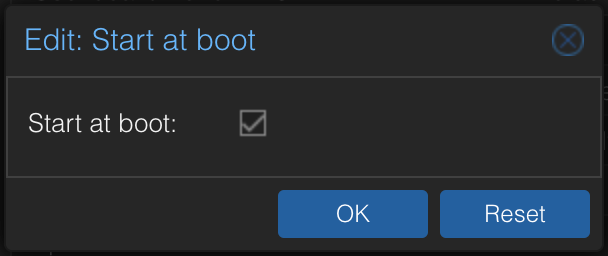
40
41Next, we need to pass through the physical drives to the VM. Open a terminal on the Proxmox server (use the built-in terminal or ssh in) and run the following command. Only run the part after the #.
42
43> root@thespia:~# lsblk -o +MODEL,SERIAL
44```bash
45NAME MAJ:MIN RM SIZE RO TYPE MOUNTPOINT MODEL SERIAL
46sda 8:0 0 698.6G 0 disk ST3750330NS 9QK2GT8R
47sdb 8:16 0 698.6G 0 disk ST3750640NS 3QD0AYE0
48sdc 8:32 0 698.6G 0 disk ST3750640NS 3QD0BQ5G
49sdd 8:48 1 111.8G 0 disk Hitachi_HTS543212L9SA02 090130FBEB00LGGJ35RF
50├─sdd1 8:49 1 1007K 0 part
51├─sdd2 8:50 1 512M 0 part /boot/efi
52└─sdd3 8:51 1 111.3G 0 part
53 ├─pve-swap 253:0 0 8G 0 lvm [SWAP]
54 ├─pve-root 253:1 0 37.8G 0 lvm /
55 ├─pve-data_tmeta 253:2 0 1G 0 lvm
56 │ └─pve-data-tpool 253:4 0 49.6G 0 lvm
57 │ ├─pve-data 253:5 0 49.6G 1 lvm
58 │ ├─pve-vm--100--cloudinit 253:6 0 4M 0 lvm
59 │ └─pve-vm--101--cloudinit 253:7 0 4M 0 lvm
60 └─pve-data_tdata 253:3 0 49.6G 0 lvm
61 └─pve-data-tpool 253:4 0 49.6G 0 lvm
62 ├─pve-data 253:5 0 49.6G 1 lvm
63 ├─pve-vm--100--cloudinit 253:6 0 4M 0 lvm
64 └─pve-vm--101--cloudinit 253:7 0 4M 0 lvm
65sde 8:64 0 465.8G 0 disk WDC_WD5000AAKS-65YGA0 WD-WCAS83511331
66├─sde1 8:65 0 465.8G 0 part
67└─sde9 8:73 0 8M 0 part
68zd0 230:0 0 32G 0 disk
69├─zd0p1 230:1 0 100M 0 part
70├─zd0p2 230:2 0 16M 0 part
71├─zd0p3 230:3 0 31.4G 0 part
72└─zd0p4 230:4 0 522M 0 part
73zd16 230:16 0 80G 0 disk
74├─zd16p1 230:17 0 1M 0 part
75└─zd16p2 230:18 0 80G 0 part
76zd32 230:32 0 4M 0 disk
77zd48 230:48 0 80G 0 disk
78├─zd48p1 230:49 0 1M 0 part
79└─zd48p2 230:50 0 80G 0 part
80zd64 230:64 0 1M 0 disk
81zd80 230:80 0 32G 0 disk
82```
83
84In my server `sda, sdb, and sdc` are my drives. I can tell because they have no partitions and are `698.6G`. Next, based on the serial numbers of the disks, find the `dev/disk/by-id` of the drive.
85
86> root@thespia:~# ls /dev/disk/by-id/
87```bash
88ata-Hitachi_HTS543212L9SA02_090130FBEB00LGGJ35RF
89ata-Hitachi_HTS543212L9SA02_090130FBEB00LGGJ35RF-part1
90ata-Hitachi_HTS543212L9SA02_090130FBEB00LGGJ35RF-part2
91ata-Hitachi_HTS543212L9SA02_090130FBEB00LGGJ35RF-part3
92ata-ST3750330NS_9QK2GT8R
93ata-ST3750640NS_3QD0AYE0
94ata-ST3750640NS_3QD0BQ5G
95ata-WDC_WD5000AAKS-65YGA0_WD-WCAS83511331
96ata-WDC_WD5000AAKS-65YGA0_WD-WCAS83511331-part1
97ata-WDC_WD5000AAKS-65YGA0_WD-WCAS83511331-part9
98dm-name-pve-root
99dm-name-pve-swap
100dm-name-pve-vm--100--cloudinit
101dm-name-pve-vm--101--cloudinit
102dm-uuid-LVM-i2jw2DEc8aJxdhf3mg7sAcAbc57lfeNL967xBhsO2KsTDqSJ5KB9pGqef5HjQJHk
103dm-uuid-LVM-i2jw2DEc8aJxdhf3mg7sAcAbc57lfeNLQ6hkWGll1H38yFz0ty3RmmJPSRSbj1sa
104dm-uuid-LVM-i2jw2DEc8aJxdhf3mg7sAcAbc57lfeNLrSofGgZtL41un6baoCpRHunOrbJeMTeO
105dm-uuid-LVM-i2jw2DEc8aJxdhf3mg7sAcAbc57lfeNLWPjyk8d4ik2D6KIcp2zaugdFsHB4TNOM
106lvm-pv-uuid-pRECVX-zqKA-evrD-PNof-sTYg-zNrD-WUelFe
107usb-Generic-_Multi-Card_20120926571200000-0:0
108wwn-0x5000c50015a53388
109wwn-0x5000cca562c751e4
110wwn-0x5000cca562c751e4-part1
111wwn-0x5000cca562c751e4-part2
112wwn-0x5000cca562c751e4-part3
113wwn-0x50014ee2ab77b23f
114wwn-0x50014ee2ab77b23f-part1
115wwn-0x50014ee2ab77b23f-part9
116```
117
118In my case, the ID of the drives I want are `ata-ST3750330NS_9QK2GT8`, `ata-ST3750640NS_3QD0AYE0`, and `ata-ST3750640NS_3QD0BQ5G`.
119
120Now find your VM_ID, mine is 102.
121
122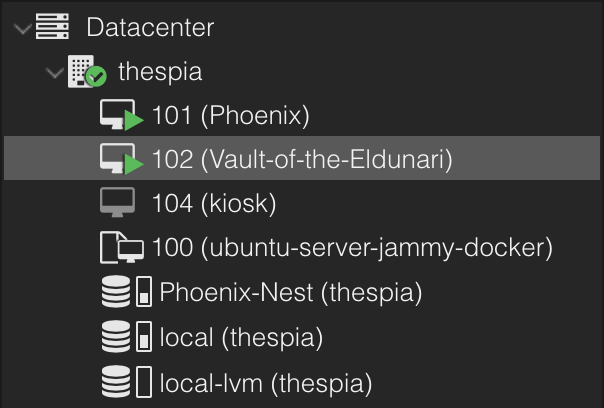
123
124Run the following command, replacing the VM_ID and DISK_ID with yours.
125
126> root@thespia:~# qm set VM_ID -scsi1 /dev/disk/by-id/DISK_ID
127```bash
128root@thespia:~# qm set 102 -scsi1 /dev/disk/by-id/ata-ST3750330NS_9QK2GT8R
129update VM 102: -scsi1 /dev/disk/by-id/ata-ST3750330NS_9QK2GT8R
130root@thespia:~# qm set 102 -scsi2 /dev/disk/by-id/ata-ST3750640NS_3QD0AYE0
131update VM 102: -scsi2 /dev/disk/by-id/ata-ST3750640NS_3QD0AYE0
132root@thespia:~# qm set 102 -scsi3 /dev/disk/by-id/ata-ST3750640NS_3QD0BQ5G
133update VM 102: -scsi3 /dev/disk/by-id/ata-ST3750640NS_3QD0BQ5G
134```
135
136Here is how it appears in Proxmox:
137
138
139
140If everything went well, then you can start your VM now. After it finishes booting up, you will get the screen below. Make sure Install/Upgrade is selected and hit enter.
141
142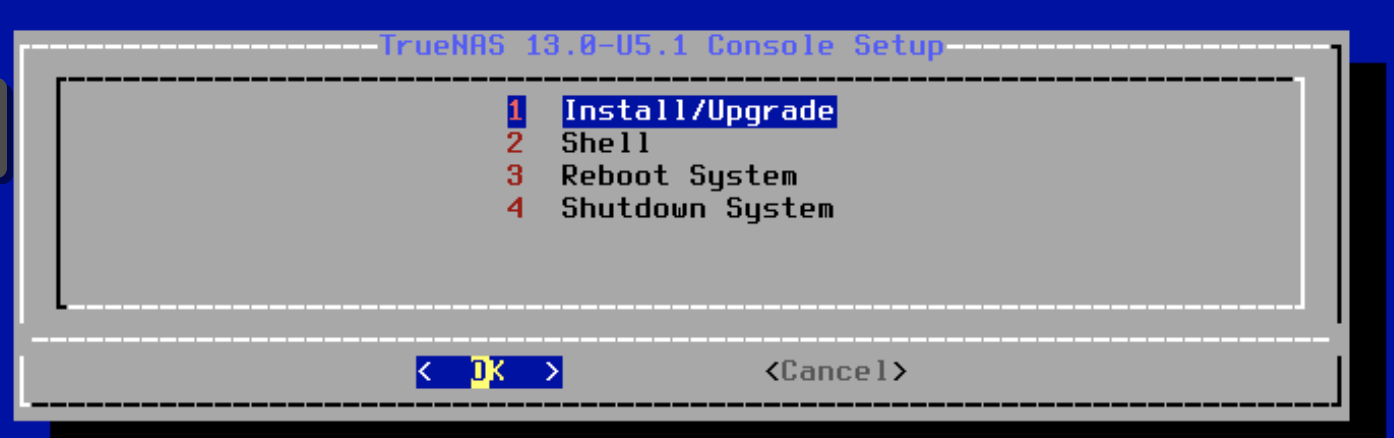
143
144You will then get this screen, use space to select the first drive and hit enter.
145
146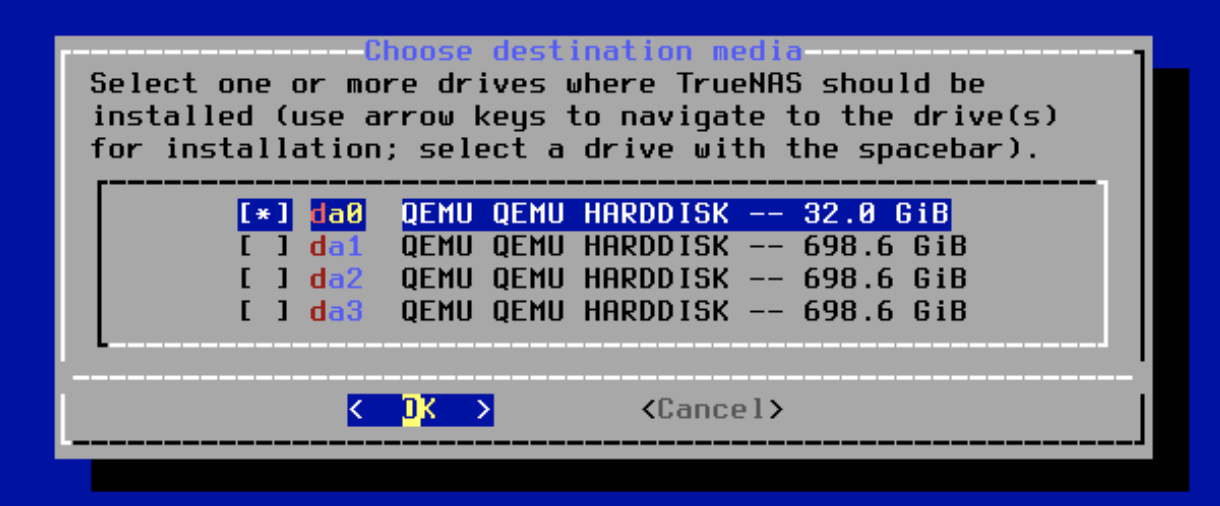
147
148Hit enter one last time and enter your password.
149
150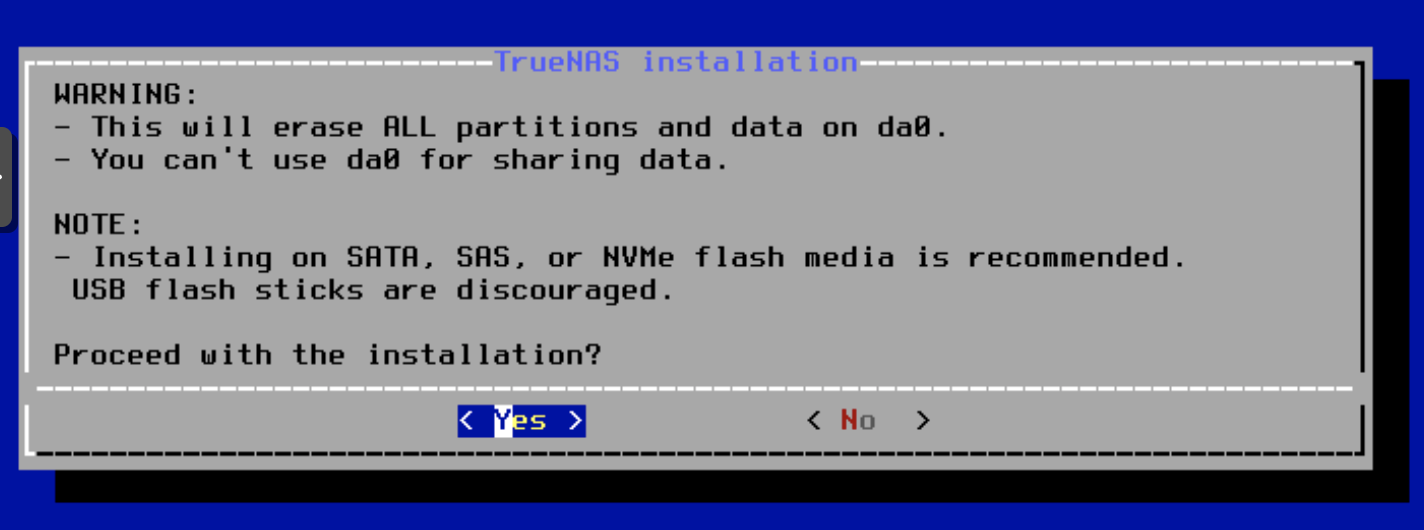
151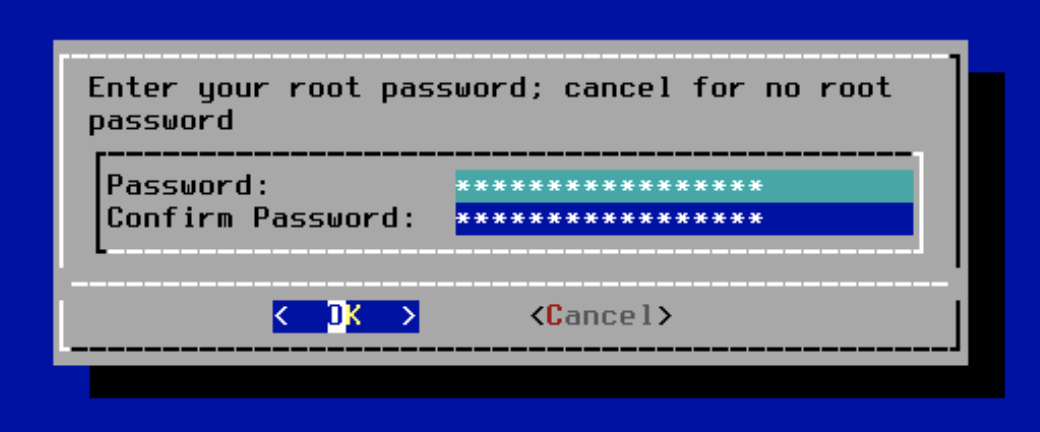
152
153Select BIOS, as this is the default mode for Proxmox VMs.
154
155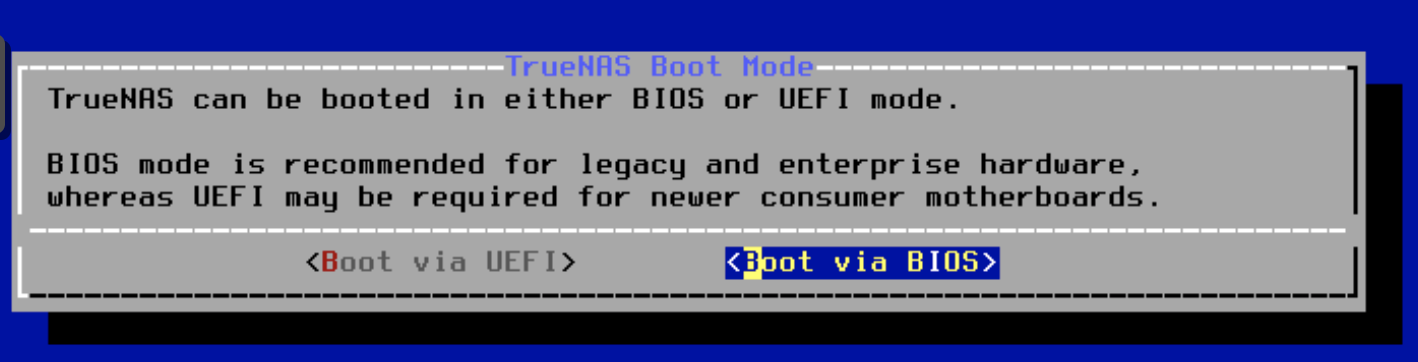
156
157After about five to ten minutes, the installation process will finish and the VM will ask you to remove installation media and reboot.
158
159
160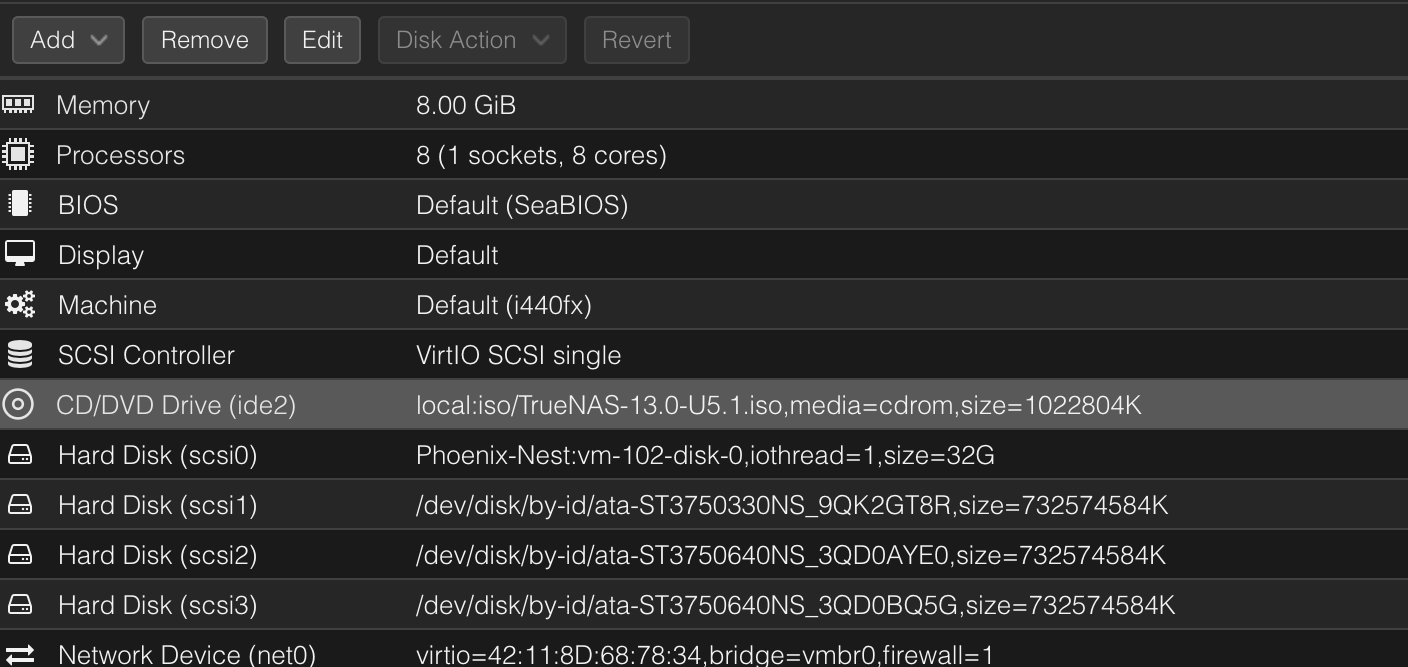
161
162Select the installation media and remove it with the top button, go back to the console and hit enter, which will take you back to the main menu. On the main menu, select reboot with the arrow keys and hit enter.
163
164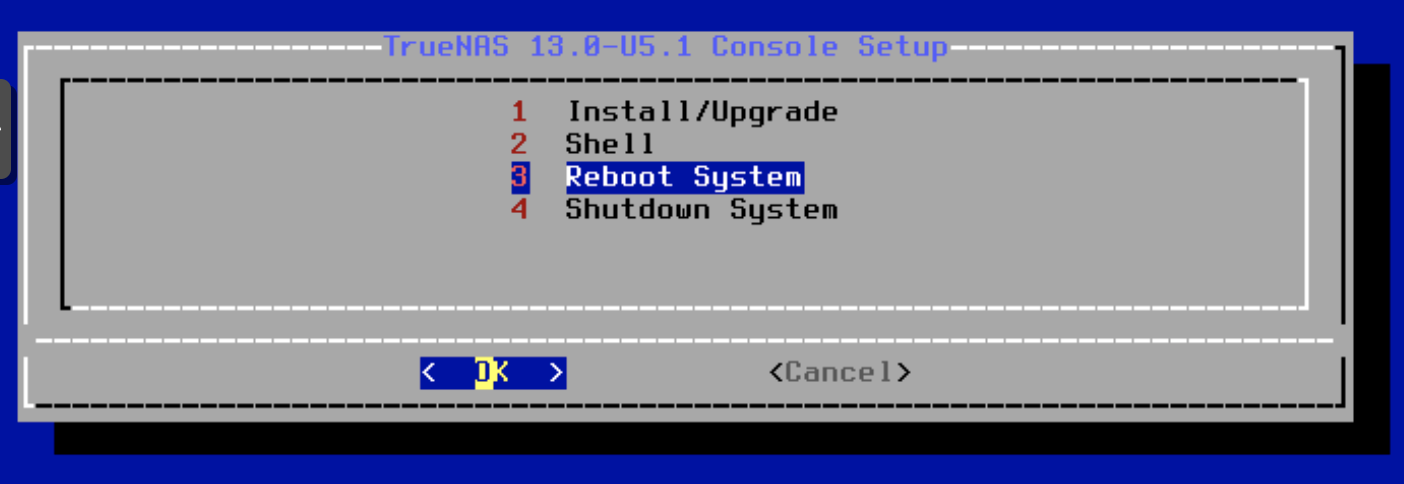
165
166Once the machine restarts, it will display an IP address in the console.
167
168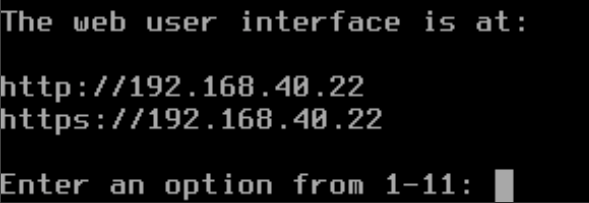
169
170Upon connecting to the IP address, you will get this screen. Use the root username and the password, previously configured, to login.
171
172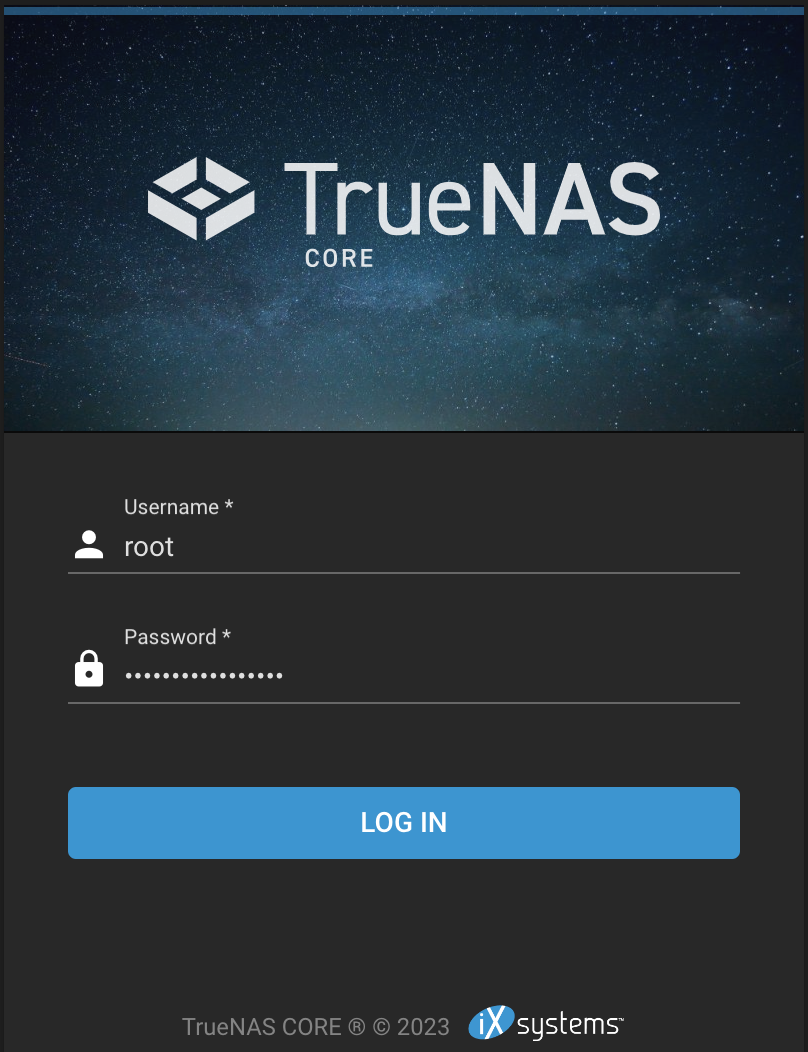
173
174Once logged in, I updated the system using the button on the home screen.
175
176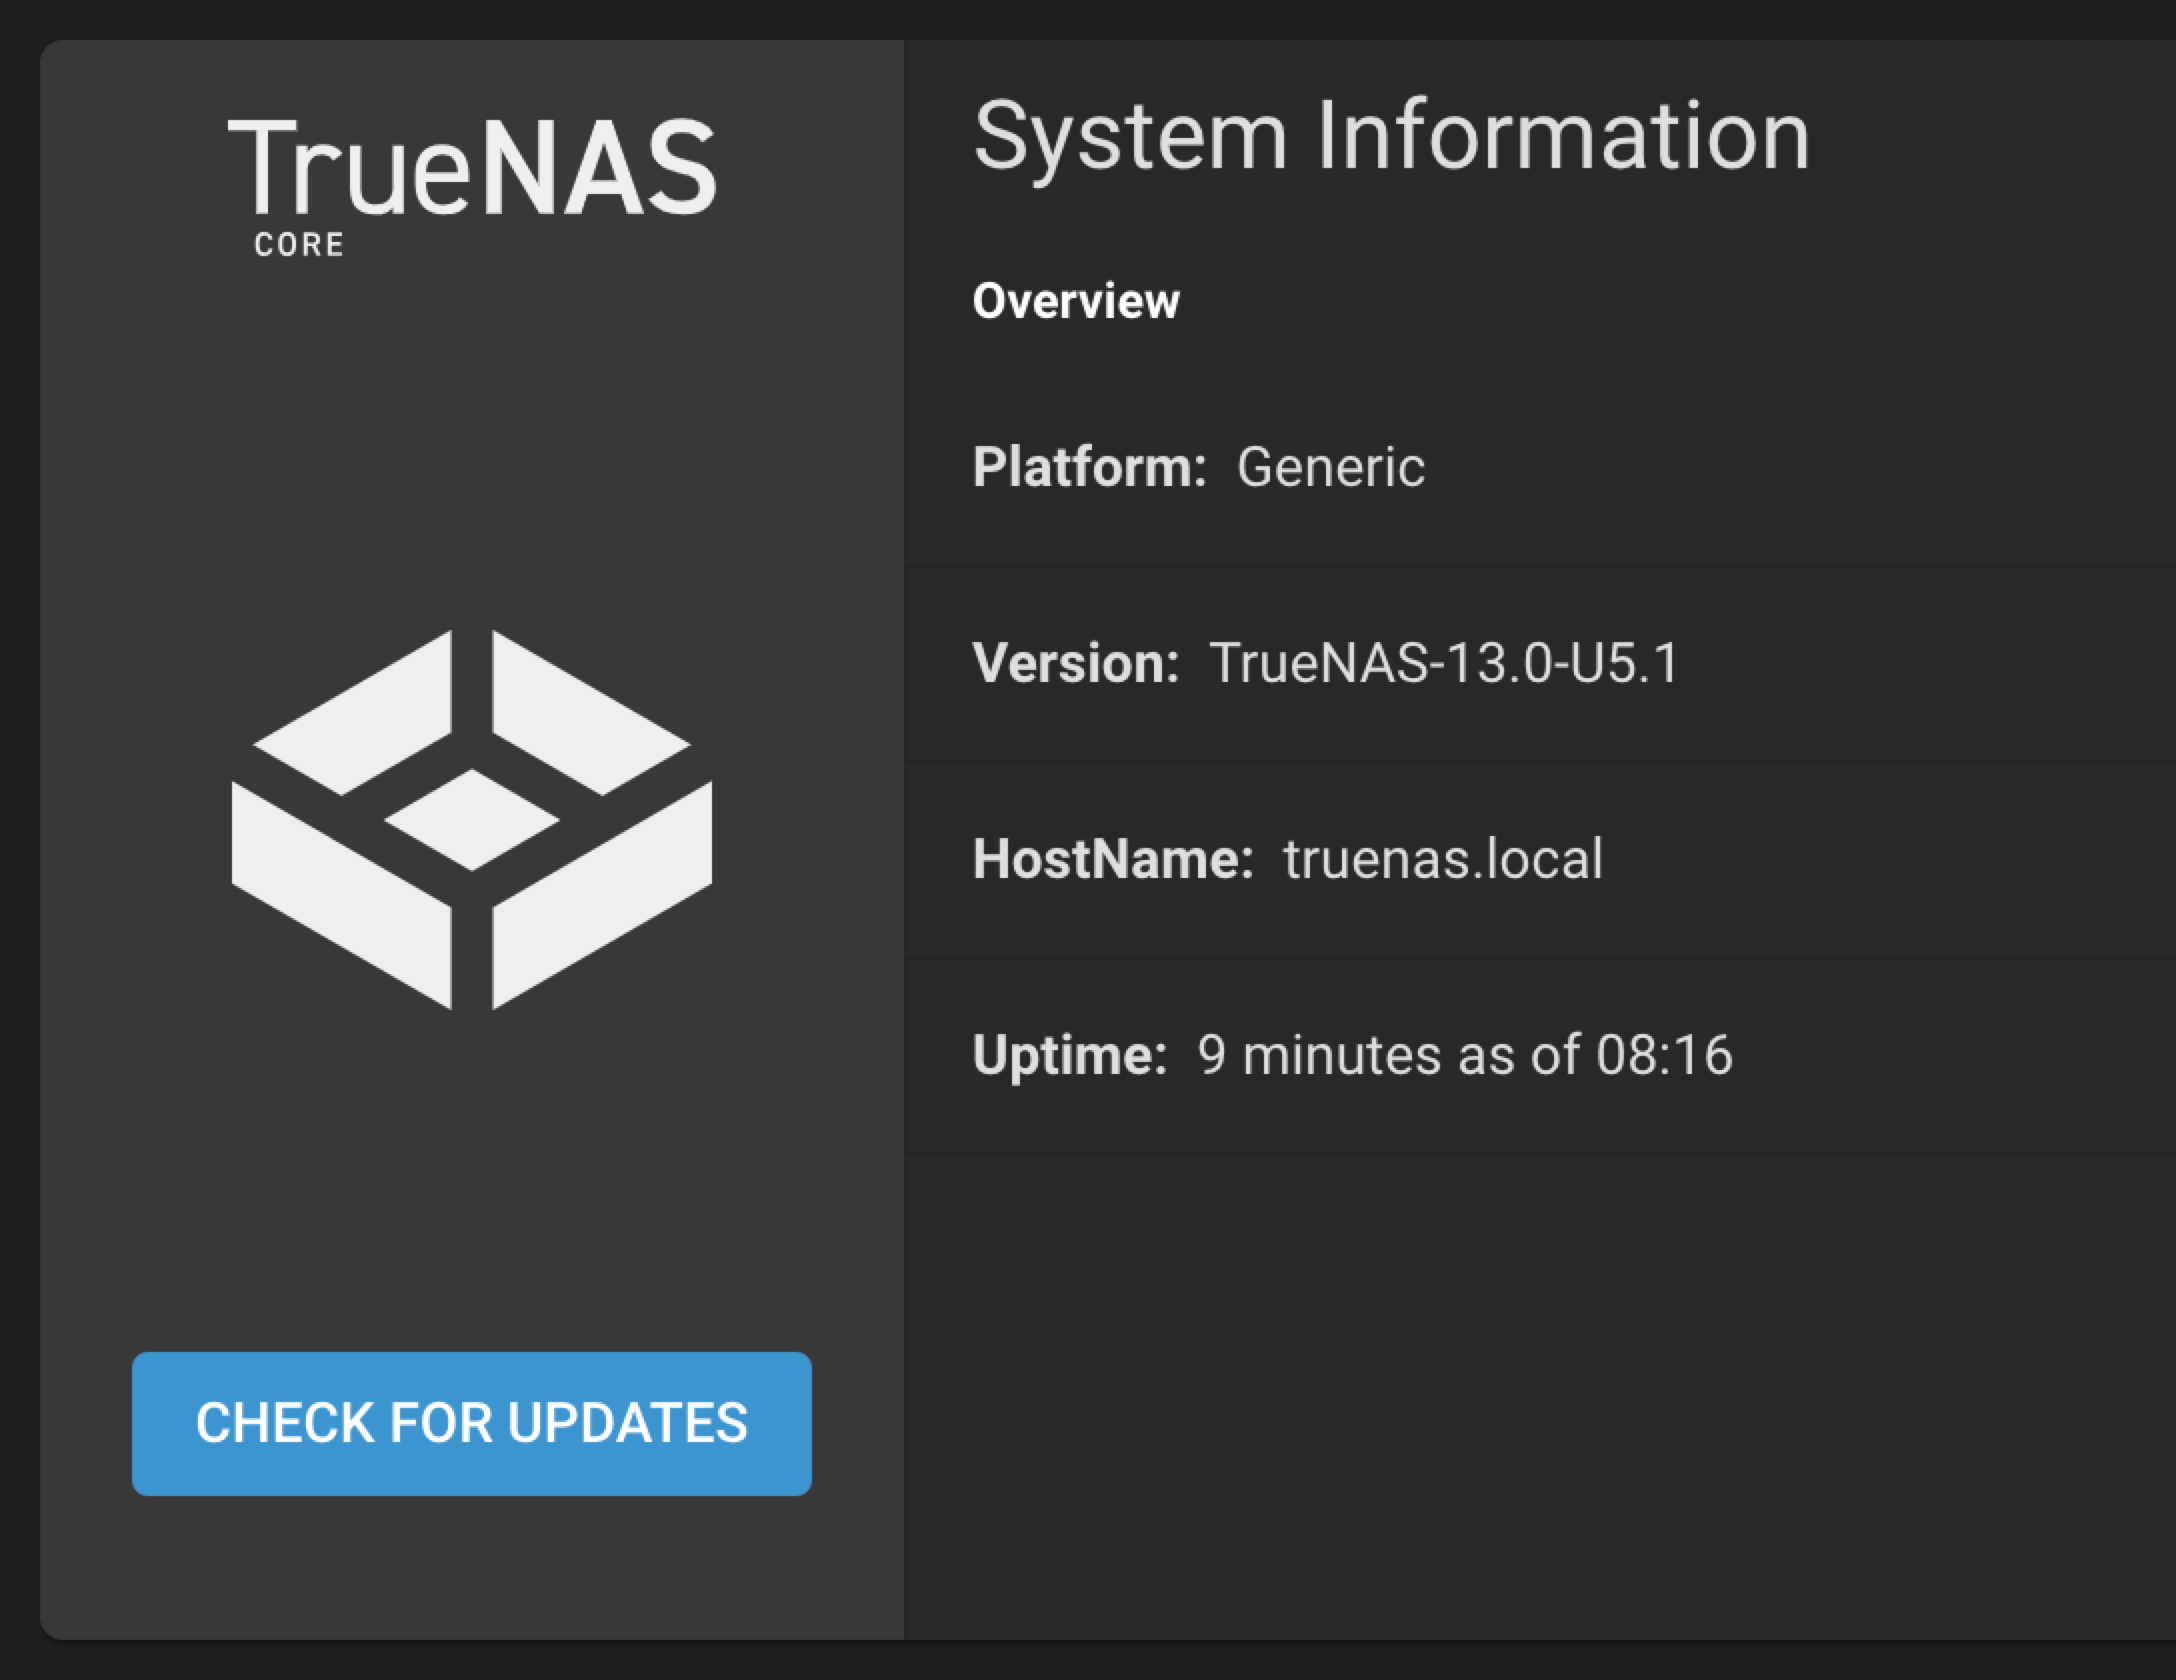
177
178I chose not to save the configuration file when prompted, proceeded to install the updates, and rebooted.
179
180I hope you enjoyed the tutorial! My inspiration to make this came from watching [“How to run TrueNAS on Proxmox?”](https://www.youtube.com/watch?v=M3pKprTdNqQ) by [Christian Lempa](https://www.youtube.com/@christianlempa). I encourage you to watch his video if you want a video guide to installing TrueNAS on Proxmox.
181
182* Written on `2023-07-10` and republished to this blog (with minor edits) on `2024-10-31`